
|
|
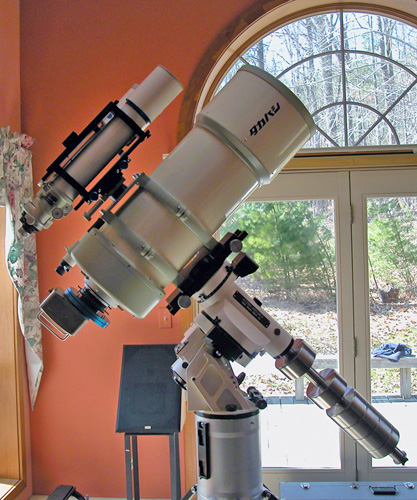
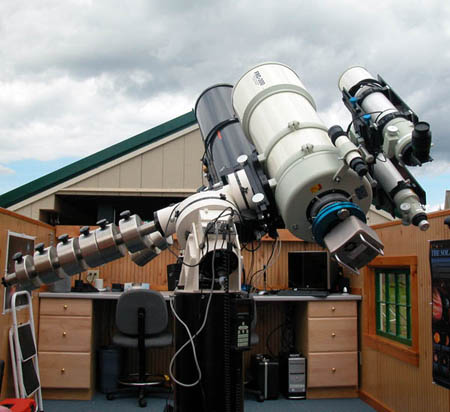
The photo at left is of my Takahashi FRC-300 set up and balanced while testing inside at George's house. I received the FRC in October of 2004 and it was only recently (April/May '05) that I received all the components to field test the system.
The OTA is 40.55" long, 12.76" in diameter and the bare tube weighs 66 pounds... This should give one an idea of the weight on the A-P 1200 GTO mount. The photo is a bit
deceiving; the system is significantly larger than it appears here at 72 inches from the bottom of the counterweight shaft to the top of the FS78 tube
rings... I'll provide a description of what's in the shot starting at the bottom of the weight shaft and working up. The six stainless steel counterweights (5 @ 21.7 and 1 @ 14.5 pounds) are by Robin Casady's Astro Accessories. The shaft is the optional 1200 version offered by Astro-Physics; this is 8" longer to allow more weights to be added and to accommodate balancing. On top of the Astro-Physics 1200 GTO I have one of their 16" Losmandy style dovetails designed for heavier systems. Next is a two part Mueller mounting system purchased through Anacortes Telescope, the firm I ordered the FRC-300 through. The Tak tube rings and top plate are supplied with the telescope. Bolted to the top plate you can see a spacer that looks much like a hockey puck; this is needed to get the plate mounted on top of it higher than the bolt heads secured to the tube rings. The 'hockey puck' was machined by Texas Nautical. These bolt heads can cause a bit of a problem, but they're heavy duty and I wished to keep them. Next is a doveEM saddle by Robin Casady designed for Takahashi mounts. You can see the extended handles I had machined to tighten the saddle; those pesky bolt heads were just below the stock handles so PreciseParts was kind enough to machine spacers for this application. This dovetail can be mounted perpendicular for a side-by-side plate or on the centerline of the FRC for a single tube. In this configuration I have it set up to accept a Casady 16" tandem bar with two-8"saddles, a Tak FS78, to serve as a guidescope and a FSQ-106N, which can be used for CCD or medium format film. The optional f5.9 reducer is in place in this image. Next is a PreciseParts custom adapter bridging the Tak helical focuser to the Finger Lakes PDF (Precision Digital Focuser), another adapter from the rear of the PDF to the front of the STL-11000 camera and last but not least, the STL camera. |
|
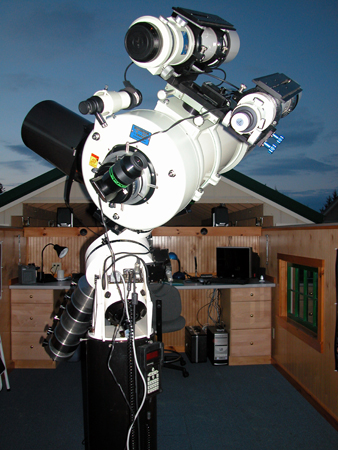
FRC-300 specifications from Takahashi: the optical system is a corrected flat-field Ritchey-Chretien at 300mm diameter; the secondary is 125mm; the native focal ratio is f7.8
at 2348mm focal length producing a 90mm image circle; reduced focal ratio is f5.9 at 1770mm producing a 36mm image circle. This is a view of the imaging system at Starburst Meadows Observatory in Brunswick, Maine, located at the home of my friend and colleague Rob Burgess. In this photograph a 2" eyepiece is being used with the FSQ dedicated diagonal so I could test the telescope visually; the FRC is designed as an astrograph and using an eyepiece was just an experiment. This also provides a good detail of the top instruments in place and balanced. Only field testing will indicate how the balance will be affected with changing the camera between the telescopes. I'd like to be able to use my STL remote guiding head on the FS78 and the STL on either the FRC or FSQ depending on the target object. Other things I'll experiment with would include exchanging the FSQ for one of my Astro-Physics 130mm scopes, most likely the f6, the weight is similar although it's a bit longer. If things worked out really well, I may even add a Pentax 6X7 body over the tubes for lens shots or rig one on the centerline for widefield lens shots. |
|
|
This observatory photo is of the FRC-300 after daylight calibration and focus. I'd already tweaked the focus manually using Maxim's FWHM method with what
clear evenings we've. To test this result I mounted a 6X7 camera body and centered on a tower that was in view. This allowed aligning the finder scope and served as a focus check.
In the end result the focus was deemed good enough to use the PDF and allow FocusMax to take over. However, I learned that the top plate assembly was close to centering
but not perfect using an eyepiece with the FSQ. I'll have to develop a method to center the bolts holding the 'hockey puck" exactly true to correct this issue.
In the meantime, the finder will work with the primary telescope for centering purposes allowing me to image.
|
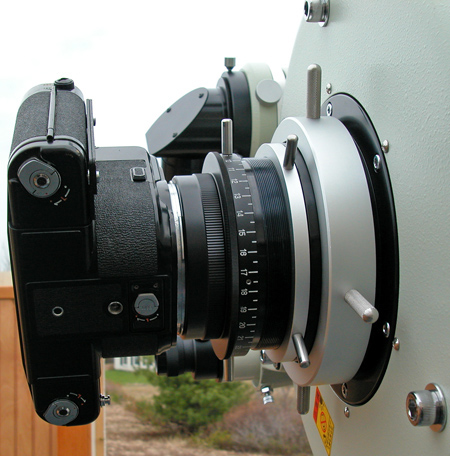
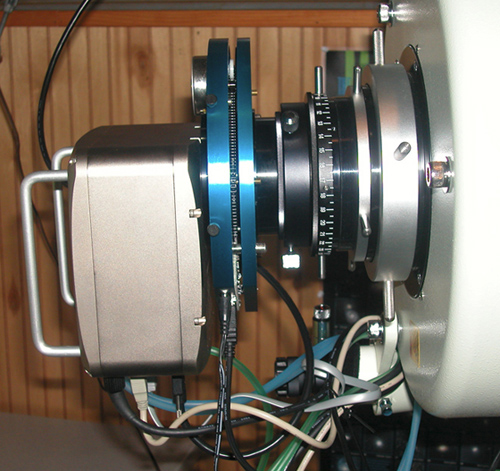
| This image is a close up view of the Pentax 6X7 body used to test focus. The FRC is designed for medium format and only one adapter is required to get up and running. The 90mm image circle for this format can only be achieved at the native focal ratio of f7.8. I may try this shooting Kodak E200 film at some point, but the sensitivity of CCD imaging is most compelling in our local sky conditions. The slanted bottom of the two inch Takahashi FSQ dedicated diagonal can be viewed behind the helical focuser in this photo. The FRC helical is an amazingly large, solid and precise focuser designed for Takahashi's astrographs. |
|
|
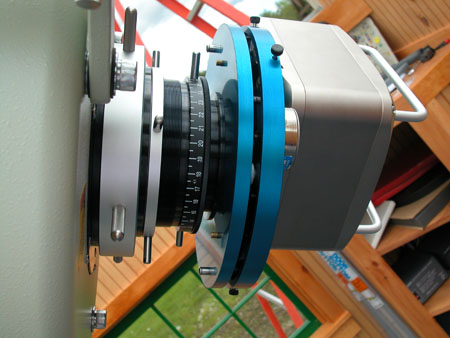
This is a view of the image train at f5.9 with the STL-11000M CCD mounted. Again the three rings of the Takahashi helical focuser can be clearly viewed. The largest silver ring nearest the tube can be loosened to
allow the entire assembly to rotate if you wished to change the camera attitude; the smaller silver ring is for locking/unlocking the focuser
and the black ring with gradations is used to adjust the focus in or out. In the native set up at f7.8, the reducer lens is removed and the flattener installed
to reach the optimal distance to the camera focal plane. This distance is critical to achieve pinpoint focus
and an adapter was machined by PreciseParts at 16.52mm to hold this dimension exactly when the PDF is at the centerline position; you can see
this adapter screwed into the face of the PDF.
To test focus, the PDF is set to the centerline position of 3500. The focal distance was determined at 83.70mm at f5.9 and 105.70mm at f7.8.
|
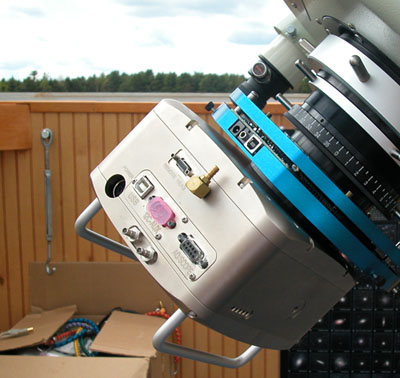
| In this view you can see the brass valve that was added to the STL camera. This is to allow a desiccated air purge into the chamber to prevent the chip from frosting. You can bet there was a bit of apprehension about drilling a hole in the new (and expensive) camera and I wish to thank Paul Howell for his able assistance in this regard. Paul's STL was the first to arrive of our imaging group and became the 'test case' for this modification... I've been asked several times where the brass 90 degree fitting came from. Paul had this piece in a box of parts in his basement and it was the only one. We don't know where it originated and none of us has seen anything like it elsewhere. |
|
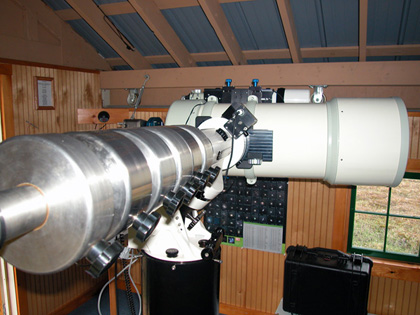
| This image is looking at the rear of the FRC system. This telescope is extremely heavy towards the back as the views indicating the tube rings demonstrate; it has to be pushed nearly to the limit touching the rings to achieve balance. This is one beautiful instrument and the construction, fit and finish is extraordinary. My research determined that this particular Ritchie-Chretien could prove superior with its flat field and temperature compensating secondary. However, the 'proofs in the pudding' so to speak and with the advent of some clear sky the real test of the optics will commence... |
|
|
This is a close up view of the image train at f7.8 with the field flattener installed set up to shoot Comet 3P/Temple 1. The Finger Lakes PDF focuser has
been tested and works well, the PreciseParts adapter was found to be right on for spacing and everything's ready to image.
|
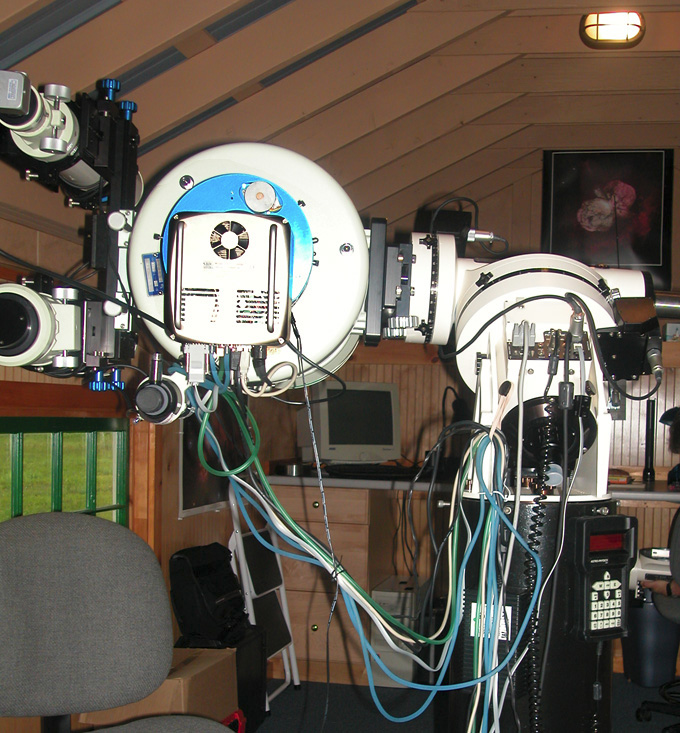
| Here is the FRC parked but ready to image. This shot depicts the numerous cables and other tubing when set up including the air (green tubing) and water (blue tubing) systems, electronic cables, etc. In the upper left hand corner the STL remote head can be viewed installed in the FS78 serving as a guidescope. You may note everything is tied off to prevent the weight hanging down on the camera possibly causing a flexure issue. This photograph represents the final imaging system configuration for the time being... |
|